Tuesday, 17 November 2015

Multiple Exposures

We have been looking at multiple exposers and how to achieve them in Photoshop. Traditionally you would create them using a film camera by taking your first image and then roll the film back to take a second image. Multiple exposures tend to be a simple image and a busy image. It doesn't have to be one of each but with film cameras the more times you expose the film the more over exposed it will become making the image too over exposed therefore too bright to pick up any detail. It wasn't very easy to take lots of exposures using film cameras, a lot of it would have been trial and error.

These days we can take as many digital images as you like and put them together in editing programs such as Photoshop.

I had a look at a few online tutorials but decided to experiment myself. 

This is one tutorial I found very useful and made a few alterations to get the outcome I wanted...


Final product image
What You'll Be Creating
You’ve probably seen this interesting effect of two or more overlapping photos on the covers of music albums, in modern magazines and in advertisements. In this tutorial we’ll create a trendy double exposure effect in Adobe Photoshop with the help of Blending Modes and Clipping Masks in a few steps. 
In photography and cinematography, multiple exposure is a combination of two or more exposures to create a single image. Initially, this is a technique in which the camera shutter is opened more than once to expose the film multiple times, usually to different images. However, with our modern software, we can easily recreate a similar effect in Adobe Photoshop.
If you’re looking for premium quality Photoshop Photo Effects and Photoshop Actions, then choose from our assortment of creative options, such as our Double Exposure Photoshop Action, which is available for purchase on GraphicRiver
Actions and pre-built effects can save you time, but in this tutorial you'll learn how to create a double exposure effect from scratch—giving you maximum flexibility and creative control. Let’s get to it!
For the base of our image, we’ll be using the following photo of a young man fromStockvault.net. You can use any photo to your liking, for example, from your personal archive. However, make sure that the background of your photo is more or less neutral, without noisy elements such as grass or foliage, to make it easier to work with.
initial photo
Let’s take the Crop Tool (C) and make the photo less wide by deleting its side parts.
crop the photo with the crop tool
Now we need to make it much brighter and add contrast. Go to Image > Adjustments > Levels or press Control-L to call the pop-up Levels menu. Move the lightest slider to the left, making our photo brighter, and add contrast by moving the left black slider to the right. Otherwise, you can just set the particular values in the spaces below: 7 for the shades of black, 1.15 for greys and 197 for whites. Click the OK button to apply the adjustments.
make the photo brighter with levels
Let’s fix the guy’s ear with the Spot Healing Brush Tool (I). Just click and move your mouse, drawing above the area you wish to fix and—voila!—the marked area is clean and flawless. This is a very handy tool for photo retouching, when you need to get rid of some minor flaws and bumps on the skin. 
edit the ear with the Spot Healing Brush Tool
Now we need to get rid of the background. This is a piece of cake, as we’re using a photo with a clean background. Take the Magic Wand Tool (W) and click anywhere on the background to select it. Then go to Select > Inverse in order to make the man selected.
select the background with the Magic Wand Tool
While you are still armed with the Magic Wand Tool (W), find the Refine Edgebutton in the control panel above to reveal the Refine Edge options window. Here you can change the View of your photo in the View Modes, placing the selected element on white, black, transparent and other backgrounds, making it more visible and convenient to edit. 
Slightly increase the Radius value in the Edge Detection, setting it to 1.5, making the edges less rigid and thus revealing minor details, such as separate hairs. Set theOutput To in the Output section of the options window to New Layer with Layer Mask. This will automatically create a copy of your initial image with the background hidden by the Clipping Mask.
You can play with other Refine Edge options as well, making the edge smoother or more blurred. This would be handy if you’re cutting out the element that is surrounded by other elements, or the image has some more complex background and the edges of the main object are messy. In our case, these minor adjustments are enough to continue creating the desired effect.
use the refine edge to cut out the portrait
Create a New Layer below the cut-out portrait and fill it with neutral greyish color (#dcdbd9) using the Paint Bucket Tool (G).
fill the background with color with Paint Bucket Tool
Let’s select the second photo for our composition. This can be some nice flower shot or cityscape, or anything abstract and intricate. For this tutorial, we’ll use this monochromatic nature scene of a forest by Samuel Rohl, which you can find atUnsplash.com.
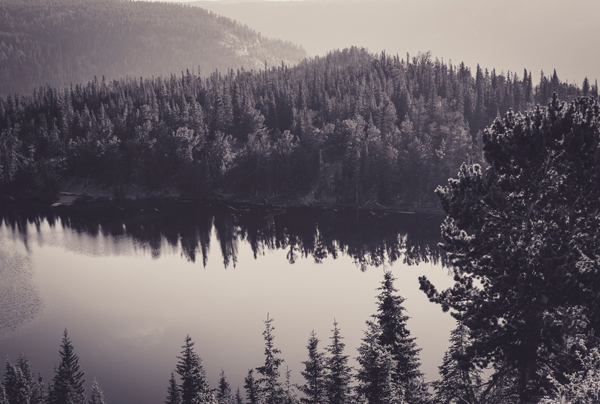
select the second photo for our photomanipulation
Place the image of the forest above the man’s portrait. Keeping the forest layer selected, press the Control key and click on the Layer Clipping Mask of the layer below (the one with the portrait). You will see the marching ants selection of the man’s silhouette on the forest layer.
make a selection from the portrait
Press the Add vector mask button in the bottom of the Layers panel to hide the unneeded parts of the forest image. If you click on the chain icon between the image thumbnail and the mask thumbnail in the Layers panel, this will unlink the layer and its mask, so that you can move and rotate the image inside the mask without moving the whole layer. 
In our case, let’s put the forest image upside down, so that the dark reflection of the trees is placed in the head area of the silhouette, as shown in the screenshot below. 
use Add vector mask and rotate the forest image
Select the layer which contains the cutout portrait with Clipping mask. Make a copy(Control-J) and drag and drop it above the forest layer.
place the portrait above the forest
Let’s make the portrait monochromatic to fit the forest image color palette. Keeping the portrait layer selected, move to Image > Adjustments > Desaturate or just press Shift-Control-U, converting our image to grayscale.
Desaturate the portrait
Open the Levels (Control-L) options window and make the image much darker by moving the black slider to the right side or manually setting its value to 117.
Apply the effect and go to Image > Adjustments > Hue/Saturation. Tick theColorize checkbox in the bottom right corner of the options window to change the whole range of colors of our image. Set the Hue value to 212, moving the slider to the right, thus adding tints of blue. Set the Saturation level to 10, decreasing the vividness of the photo, and click OK to apply the created effect.
edit the hue and saturation of the photo
Right-click on the portrait layer mask and we can Apply Layer Mask in the dropdown menu. Change the Blending Mode of the portrait layer to Screen in theLayers panel. We can already see that the desired double exposure effect appears! Only a few minor tweaks left, so let’s move on!
apply the mask the switch to screen blending mode
Let’s make the image more surrealistic by editing the head of the portrait. Take theBrush Tool (B) and select the Airbrush Soft Round 17 from the standard Round Brushes with Size set (you can find it in the drop down brushes menu if you click the right mouse button or in the Brushes (F5) panel).
Select the Layer Mask of the forest layer, set the Fill color to white and paint softly over the upper part of the head area (marked with red in the screenshot), thus erasing the unwanted parts of the head and adding some air in the top part of the image. This makes the image look as if the trees are growing directly from the man’s head.
edit the top of the head with the brush tool
Some parts of the image look too noisy at this step—for example, the eyes area, where the trees from the forest image create a distracting effect. Let’s get rid of this and make these parts more clear and contrast. 
Create a New Layer beneath the desaturated portrait layer, take the Brush Tool (B)again and switch the Fill color to dark blue (#2f2c35), which you can pick directly from the hair part of the portrait with the Eyedropper Tool (I). 
Start painting over the eyes area, making it more distinct. For more convenience, you can Control-click on the layer mask of the portrait layer to create a marching ants selection, which allows you to draw inside the selected area, without crossing its boundaries.
make the eyes area more clear and contrast
Step 9
Let’s add a finishing touch to our image. Select the desaturated portrait layer andAdd Layer Mask by clicking the mask icon in the bottom part of the Layers panel. Take the Brush Tool (B) and switch the Fill color to black. Since our Layer mask is white by default, the black color will help us to erase the unwanted parts of the image. Paint over the neck area of the man, creating an illusion of his face popping out from the trees.
edit the neck of the portrait with the layer mask
Congratulations! These simple steps helped us to create a stylish double exposure portrait by combining two images and creating an interesting surrealistic effect. I hope you’ve found some handy tips and tricks, which will help you to make more interesting combinations and photo manipulations. Good luck!
finale double exposure result

(This tutorial was found at http://design.tutsplus.com/tutorials/make-a-trendy-double-exposure-effect-in-adobe-photoshop--cms-23774 on 19.01.2016)


Below are a few images I found online which I liked and inspired me to try the final image I created...


(Image found at http://www.popphoto.com/sites/popphoto.com/files/styles/medium_1x_/public/import/2014/files/_images/201404/pph0414_ycd_01.jpg?itok=B0C1PbVY on 19.01.2016)


(Image found at http://www.christofferrelander.com/wp-content/uploads/2013/12/appletree800px.jpg on 19.01.2016)


(Image found at https://c1.staticflickr.com/3/2863/11754546425_4af687f33a_b.jpg on 19.01.2016)


(Image found at http://www.vineet-suthan.com/photoblog/wp-content/uploads/2014/09/vanidoublexposure.jpg on 19.01.2016)


Below are the before and after images...


I added the above images behind a picture of the Nottingham Council house then changed the blending mode to Colour Burn and set the opacity to 80%. I then added a Black and White adjustment layer. Below is the final image...


I placed the second image on top the metal image and again selected Colour Burn blending mode and set the opacity to 80%.


I love this image because of the colours and the way it looks almost like a painting. It is unique and different.


This one was more difficult and took more time but was just as fun to create as the other two. I used my daughters head shot and the image of the tree above. I opened a new blank page in Photoshop and added my daughters head shot in a new level. I then erased her hair using the eraser so it just looked white. I then added a new layer with the tree under the layer of my daughters face. I transformed the tree to turn it 90 degrees clockwise and then made it slightly bigger to match the size of the head. I then selected the head layer and continued to erase with a low opacity and flow to make the face blend with the hair better. Once I was happy with the outcome I added a Black and White adjustment layer and a levels layer to brighten the image slightly. This is my end result...


I love this image as it is very surreal but effective. I am very happy with how this image turned out and I would like to create more like this in my spare time but using different body parts and different tree shots.

Overall I have really enjoyed experimenting with multiple exposure and would love to do more. I think you have to have a very creative mind for this type of photography as I think its easier to plan what you want to end up with instead of going out and shooting anything. It has to work and I feel I was very lucky with my 3 images.  

Tuesday, 3 November 2015

Image Manipulation

Image manipulation is taking an image and changing it to something that you want it to be. For example, if you have an portrait of a man or a woman and they had a strand of hair on their face you could change the image by removing the hair. There is subtly manipulating an image and there is drastically changing the image to something no where near what you started out with in the first place. Manipulating images has been going on for years and years. Any one can be airbrushed to make them look perfect and seem most aesthetically pleasing to the eye.


Below is a basic description of image manipulation, where it stemmed from and how it was used in the past and now in the present...


Image manipulation is the art of transforming an image to convey what you want, rather than what the original image may have shown. This can be done for artistic reasons, but because of the power of the photograph to show true depictions of reality (and the high regard that people can hold for a picture as evidence), this can also be done for reasons of deceit. The process is sometimes known as airbrushing, after the tools that can be used to achieve the result, or photoshopping, after Adobe Photoshop, the most common tool used in the digital age. 
Manipulating images dates long before the invention of the camera, as portraits of people (as well as landscapes and scenes) were painted with a little "artistic interpretation". As a result, many portraits of individuals were painted to be much more flattering. This trend was briefly bucked by Oliver Cromwell for a painting of him by Sir Peter Lely, where Cromwell was alleged to remark "but remark all these roughnesses, pimples, warts and everything as you see me." This was later reduced by various accounts to "warts and all", and the phrase has become a idiom for truth telling, regardless of how ugly it may be.[1] With the advent of photography in the 19th Century, kings and queens no longer had the ability to manipulate their painted portraits, and so could be photographed as an exact likeness. This trend was to set the precedent for photography producing true likenesses of people and events, with no room for fakery.
However, along with pornography, photographic manipulation began almost as soon as photography was invented. Some of the earliest recorded manipulations come from Civil War era America, where composite images were made of Abraham Lincoln and Ulysses S. Grant.[2] These early manipulations were done using inks, airbrushes and darkroom techniques, but since the 1980s, almost all manipulations have been done via computers. Airbrushing and photomanipulation is now accessible to almost anyone and Adobe's Photoshop makes regular appearances on lists of most pirated software. 


Image found at http://rationalwiki.org/wiki/Image_manipulation on 03.11.2015
 

I have digitally manipulated a couple of images using Photoshop in post production. The first one I did was using only my own images which I have taken.

Here are the images I have used to make my final image...


I chose these 3 as they have the location in common, they were all taken on a trip to Budapest earlier this year. 

To start with I opened up Photoshop and opened all 3 images on separate tabs so I could flip between them all to make it easier. I also created a blank page to move everything onto.

This is what I did...

  1. Cut the bird out using the pen tool and drag it onto the blank page 
  2. Cut around the star, select it and invert the selections so it it the foreground around the star that is selected and not the actual star, again using the pen tool and drag it onto the blank page
  3. Resize the bird to sit its head behind the star cut out 
  4. Add the sky shot to the mix but making sure it sits behind everything 
  5. Change the opacity of the sky layer to make it paler 
  6. Use quick mask tool to select the birds eye, copy and paste it, then use levels and curves on it to change the colour
  7. Use the gradient tool to add shading/shadow to the bird to make it look more realistic
  8. Cut the star image in half and place the top half behind the birds head (move that layer under the bird layer). This makes the bird appear to be poking its head through the star
This is the final image I ended up with...


I am very pleased with the outcome of this experiment in image manipulation. I wasn't sure if it would work or not but it worked perfectly so I am very happy. 


Next I manipulated an image which I got from Google. I was following a tutorial put together by my tutor but added and changed bits to make it exactly how I wanted it once I had an idea of how I wanted mine to look.

This is the image I used...


To start with I opened up Photoshop and opened the main image and a second image of a plug on separate tabs so I could flip between them to make it easier. I also created a blank A4 page to move everything onto.

This is what I did...

  1. Double click to unlock the background on both images
  2. Use move tool to drag main image to the blank A4 sheet
  3. Select Marquee tool - Elliptical (oval) to cover one of the eyes
  4. (Add to selection) and cover the other eye
  5. Again, repeat that process but with the lips
  6. Select Gradient tool 
  7. Choose a colour as close to the area of the eyes and lips to make it look realistic
  8. Duplicate layer
  9. Layer - layer mask - reveal all
  10. Select brush tool
  11. Select layer mask
  12. Swap to black above white
  13. Select original image to chose new colour to blend with
  14. Add the second image (the plug) to the face, rotate it and resize
  15. Choose multiply as a blending mode with the plug layer
  16. Layer - layer mask - reveal all
  17. Duplicate layer
  18. Choose linear burn as a blending mode with the new plug layer
  19. Finally select transform - warp to make it more realistic and not just stuck on

This is the freaky but funny image I ended up with...


This image makes me laugh every time I look at it. It's amusing because I managed to find a plug image which wasn't taken straight on so it looks like it is a mouth and two eyes because of the shadows cast. I had a lot of fun making this image what it is. It was difficult at times but with a lot of time and patience it was worth the wait.
I would love to do more of these as they are good fun and it would be interesting to see what other ideas I could come up with and also there are a lot of different styles of plugs to try.

Overall I really enjoy Image Manipulation, you never know what you are going to end up with and there are so many different things to try that its doesn't get boring at all. The only downside is the amount of time it takes to produce anything.


Image Stacking/Focus Stacking

This technique is fantastic for if you want get a crystal clear image which is completely in focus from the foreground at the front of the image through to the furthest point away in the background. You have to take multiple images at different focal lengths but make sure that all of the focal lengths overlap to make post production easier. Normally when you want to achieve a greater depth of field you change your f stop setting to a higher number. This isn't always the best thing to do though as you have to increase the shutter speed and can sometimes cause diffraction so you can actually lose some of the image sharpness.

I have seen that this technique works very well for close ups and macro.


Below is another tutorial I have found which shows you before and after images as well as how to do it. I will be trying this technique myself and will upload my before and after images as well as describe how I did it.


FOCUS STACKING & DEPTH OF FIELD

Focus stacking is a powerful technique for extending a photo's apparent depth of field. It's perhaps most useful in close-up and macro photography, since the camera lens's highest f-stop is often insufficient to render everything in focus. It can even overcome the otherwise unavoidable sharpness loss from diffraction. However, focus stacking is also quite a complicated technique to master. Continue reading to learn more about this powerful tool.

Extended Depth of Field Example - Clare Bridge, Cambridge, England
Photo taken under full moonlight atop Clare Bridge in Cambridge, England.
Two focusing distances were used: one for the sphere and the other for the background.

WHEN TO USE IMAGE STACKING

When a photographer requires more depth of field, they typically just increase the f-stop setting of their camera lens. While this is a simple and effective technique, choosing a higher f-stop also has its disadvantages. It increases the necessary exposure time, and in extreme cases, it can also reduce image sharpness due to diffraction. Furthermore, one might desire a greater depth of field than a particular lens's maximum f-stop is able to provide. Specific example scenarios may include:
Extended DoF Landscape ExampleLandscape Photography
shallow depth of field macro photograph of antsMacro Photography
macro photo by Piotr Naskrecki
Extended DoF Low-light ExampleLow-light Photography
  • Landscape photography: one may wish to obtain a vast depth of field, while also avoiding softness at the focal plane due to diffraction. This can enable a much larger and sharper print than otherwise possible.
  • Macro photography: one may wish to achieve a greater depth of field than otherwise obtainable using the lens's maximum f-stop (often f/22 or f/32 with SLR cameras).
  • Low-light photography: one may want to avoid a prohibitively long exposure time. Alternatively, one may wish to freeze motion in part of their image (such as with a moving subject), but also to preserve an expansive depth of field in other parts of the photo (without resorting to using a flash).
What's the solution? To combine several separate images (aka "image stacking"). This avoids many of the disadvantages of using too high an f-stop, while also retaining the advantage of a large depth of field. In this article, we'll focus on a type of image stacking that merges several photos which were taken at different focusing distances — producing a single, extended depth of field composite (aka "focus stacking"). In the second part of this tutorial we'll instead focus on stacking images taken at different f-stops.

OVERVIEW

Focus stacking works in three general stages:
stacked image capture1. Capture
align/register stacked images2. Align
merge/blend stacked images3. Merge
  1. Several photos are taken by gradually incrementing the focusing distance across the subject. The number of separate photos ranges from a couple (for two distinct layers of subject matter) to as many as dozens (for expansive scenes). In general, moving subject matter should be avoided.
  2. These photos are then aligned so that their content is overlaid pixel by pixel. This step is necessary even when using a tripod, since changing the focusing distance always causes misalignment (more on this later).
  3. A composite image is then created based on the sharpest regions from each of these separate photos. If the subject is composed of only a few distinct layers (such as the sphere example above), then this can be performed manually using layer masks. Otherwise Adobe Photoshop CS4+ or specialized software packages such as Helicon Focus, TuFuse or CombineZM are required.

STAGE 1: CAPTURING THE PHOTOS

The most important decision with focus stacking is choosing how many photos to take. This is influenced by the following factors:
  Required # of Stacked Photos
When the # subject layers increases . . . Increases
When the f-stop increases . . . Decreases
When subject magnification increases . . . Increases
When print/image size increases . . . Increases
In other words, all of the same principles which apply to depth of field also apply here. If your subject spans a large distance and you plan on making a large print, you'll need a high f-stop to achieve sufficient depth of field. The only difference is that now you have one more dial under your control: the number of stacked images. For example, now you can get away with a lower f-stop if you just stack more images (or vice versa).
One could estimate the number of photos from a formula, but it's probably best to instead develop an intuition for how many you'll need. If you almost had enough depth of field without focus stacking, start by stacking just 2-3 images with evenly spaced focusing distances across your subject, then see how this looks. The key is to experiment a lot when starting out. In the example below, one can see that three photos will be sufficient as long as the image isn't displayed any larger than it is shown here:
Extended Depth of Field - Near Focus ImageNear Focus
Extended Depth of Field - Middle Focus ImageMiddle Focus
Extended Depth of Field - Far Focus ImageFar Focus
Note: Above photos have been pre-aligned to make the depth of field easier to compare.
Before alignment, the left image was slightly larger than that in the middle and right images
(see stage 2 for more on this topic).
Optimal Focusing Distance Spacing. The key is to ensure that the depth of field for each subsequent photo overlaps with the depth of field from the prior photo. This way no softness will be present in the final composite. More closely spaced focusing distances often produce more consistent and natural looking sharpness, but this can take a lot longer to capture and requires more storage space, so try to avoid overdoing it.
Example of wave-like depth of field
Be extra careful to avoid the wave-like depth of field which can result from focusing distances which are too widely spaced (as shown in the example to the left). As you can see, if the above example used a lower f-stop, more images would need to be stacked. Also try using the camera's "live view" rear LCD feature for more consistent focus distance spacing. For advanced stacks, you might want to connect your camera to a laptop (if supported) so that you can see an enlarged preview and control the focusing distance precisely.
If your subject spans the entire distance from your camera to the distant background, then you'll need to ensure that you've chosen a span of focusing distances that renders all of this in sharp focus. In this case, the focus stacking technique really needs to be an all or nothing approach, otherwise subjects can be rendered with an unnatural and abrupt depth of field. The only time you can get away with just a few focusing distances is when your subject is composed of distinct layers (such as the sphere example at the beginning).
Optimal F-Stop. Using higher f-stop values allows for more sparsely spaced focusing distances, but this can also decrease the sharpness of the final image. It's generally a good idea to choose as high an f-stop as possible without inducing visible softening due to diffraction. If in doubt, values of f/11-f/16 often work great with SLR cameras.

STAGE 2: ALIGNING THE PHOTOS

Unlike extending the depth of field by varying the f-stop, varying the focusing distance causes each individual photo to become misaligned. This is because the effective focal length of a lens actually changes slightly when one alters the focusing distance (see tutorial on macro lenses & extension). As a result, the angle of view also changes — giving images the appearance of zooming in or out when focusing near or far, respectively:
Example of focusing distance versus angle of view
Closer Focusing Distance
(narrower angle of view)
Farther Focusing Distance
(wider angle of view)
Special software therefore needs to re-align (aka "register") the separate images. Necessary software packages might include TuFuse, Helicon Focus, CombineZM or some combination of Adobe Photoshop's Auto-Merge and Auto-Align features. Fortunately, all of these produce very similar results when aligning images. In Photoshop, you can use either "File > Automate > Photomerge..." or "Edit > Auto-Align Layers..." as shown:
Photomerge...
... OR ...
Auto-Align Layers...
photoshop photomerge/auto-align mode: collage
If you use Photomerge, then you can effectively perform stages 2 & 3 at the same time if you also check the box that says "Blend Images Together." If the photos were taken on a tripod (as they should be), then it's best to use the "Collage" option (shown on the right). If you're using another software package, this is equivalent to making sure that the software only repositions and resizes the images when aligning them.
If you use "Auto-Blend Layers," then you'll need to first ensure that all your photos are already pasted on top of each other as layers in Photoshop.

STAGE 3: MERGING & BLENDING THE PHOTOS

Merging the images requires determining which stacked photo contains the sharpest representation of each image region. In the example below, software was used to select and merge only the sharpest portions from each of the three focusing distances:
Focus:
Near Middle Far
Sharpest Portion
Final Composite
Unfortunately, image merging/blending quality can vary substantially depending on the image stacking software being used. With a simple subject that has well-defined layers (such as the above example), results will likely be similar. However, whenever the layers are irregular and highly intertwined, results can vary dramatically. You can always manually edit which photo contributes where, but this can be quite time consuming. It's therefore recommended that you first experiment with trial versions of whatever software you're considering.
In Photoshop, if you already used Photomerge to align the images in stage 2 above, then these photos may have already been merged if the "blend images together" box was checked. Otherwise you can blend these as follows:
stacked image layers (1) Select layered photos
blend method: stack images (2) Go to "Edit > Auto-Blend Layers..."
using the top menu,
then check "Stack Images."
stacked image layers with blending masks Resulting Layers
You'll be left with layer masks for each stacked photo (far right image above), so all you have to do is flatten the image (select all layers and go to "Layer > Flatten Image") and you'll be left with a sharp, extended depth of field photo. Just in case though, make sure to closely inspect the final result and edit the layer masks as necessary.

FOCUS STACKING: LIMITATIONS & ALTERNATIVES

Focus stacking is an amazingly powerful technique, but it definitely has disadvantages:
  • It can be very time-consuming.
  • It usually requires the subject matter to be motionless.
  • It may require a precision focusing device (such as a focusing rail) when large numbers of photos need to be stacked (such as with extreme macro photography).
  • It requires specialized software to align and merge/blend the photos.
Two excellent alternatives include:

This information was found at http://www.cambridgeincolour.com/tutorials/focus-stacking.htm on 03.11.2015